As the Harry Potter series comes to an end, Framestore’s team takes a magical splash into the
Chamber of Secrets, and briefly follows Harry into the afterlife and back again.More Harry
Potter FX- See the Cover Feature in DMW No 136 'Dragons Live Forever'.
 |
|
| VFX Supervisor Andy Kind, leading the team on the final Harry Potter film, remarked that their contribution may have been modest in quantity, but the technical challenge was considerable, combined with creating stereo 3D versions of their sequences to a high standard.
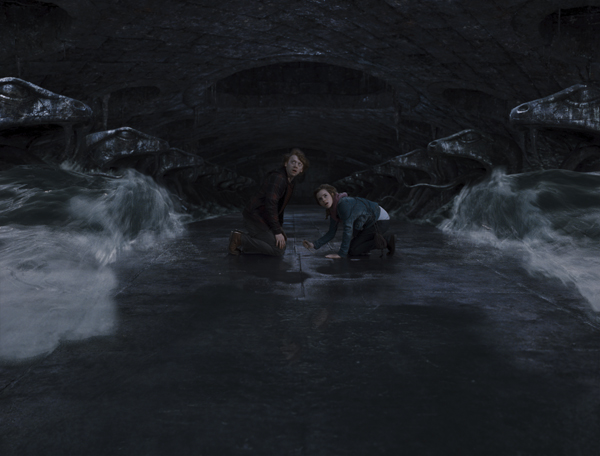
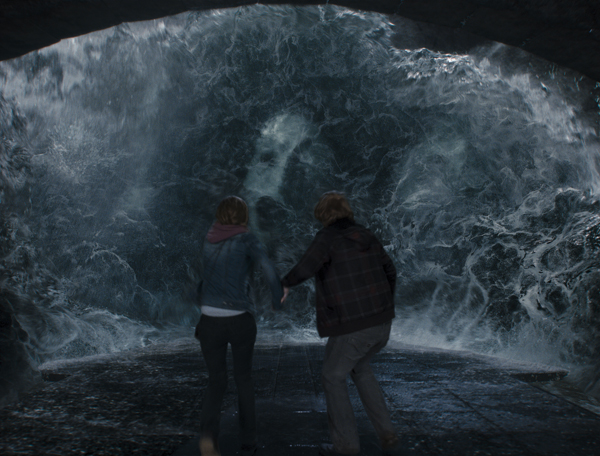
Washed Up The location's brief reappearance made a digital environment more practical than a full practical construction as it had been in earlier films, and the sequence was filmed entirely on green screen. Framestore used a pre-vis model of the chamber from their previous work on the second film and the original sequence for reference, essentially modelling and texturing from the ground up. But recreating the Chamber was not the main challenge. The huge water simulation had to be created as a character. “You had to convey that it was moved by a sort of primitive intelligence and malevolence, and show these forces rising and finally exhausting themselves,” said Andy. “Quite a bit of time was initially spent working out how to reveal Voldemort’s head in the mass of water. We didn't want a ‘rubber sheet’ look, so our FX team developed the technique of allowing the water simulation to advect, or transfer by flowing, toward and away from a goal shape. In this case we used a closed mesh of Voldemort's head with an open screaming mouth.” |
|
 |
|
| Natural Splash Senior FX TD Alex Rothwell said, “We knew early on that we were going for water simulation rather than any sort of rig-based animated model, which rarely looks completely natural,” he said. “We used Naiad, a new liquid and gas simulation tool developed by Swedish company Exotic Matter. Naiad is very good at generating natural water movement - stuff that obeys the same laws of physics that actual water does.” Alex also explained that water behaving naturally is hard to control without making it look constrained and contrived. The artists had to keep the splashiness and fluidity, and constrain it using force rather than surface control. Beyond look development, meshing was a further concern because the results from Naiad couldn’t be rendered directly through Renderman. They used a tool written by software developer Martin Preston fApproxDist. “It takes all the points coming out of Naiad and produces a mesh which gets passed on to the lighters, and from then on it's a lighting and shading job,” said Alex. When the main water simulation was completed and baked, it was fed back into the system for a series of foam and spray passes, also generated through Naiad, which hang off the main simulation. Framestore's compositing team on this film was led by Christian Kaestner. The artists started in the Chamber with pure ambient light, which was quite dark. “As we went through it with the client,” Christian said, “we ended up putting in lights to give the basilisk head and the chamber itself some kind of shape. We also had an extra pass - the water sparkle pass - which would give little bit of shine on the floor. |
|
 |
|
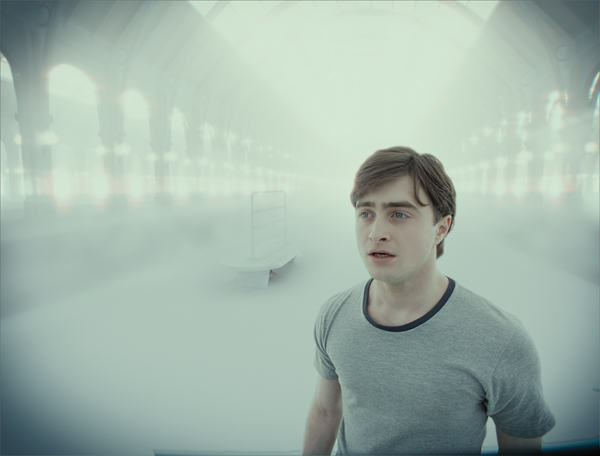
| Sensitive Water “This sequence was the most challenging technically, as it was something we hadn't really pursued before. We'd done the standing wave for ‘The Voyage of the Dawn Treader’, also using Naiad, but animating water with a character to maintain, and to give it the look and feel that the client wanted, was tricky.” They found that calibrating water is as sensitive as the skin of the house elves they created in the previous film. It had to be just right, neither too clear nor too murky. Numerous elements - subsurface scattering, how much light passed through, reflection, detail – had to be combined in the right proportions. “We used as much reference as we could lay our hands on - from water in blow-holes, caves and rivers to filming ourselves rolling a water bottle through an improvised puddle to get reference for the shot of the cup rolling after Hermione stabbed it,” said Andy. “As with a lot of effects work our biggest challenge was scale and trying to find tricks where we could apply the detail where it was needed and cull where it wasn't.” To provide a 3D version, they made realistic renders of left and right eye cameras with the water, but if calculated correctly, the result was different subsurface scatter and refraction and reflection in each camera, which in the real world the eye and brain naturally compensate for through convergence. So they had to cheat reality in order to make it look real. Andy said, “For stereo we found it almost impossible to use standard compositing tricks of layering library footage over simulations to add depth and detail. We did create library elements, but they needed to be cg and had to be initially simulated so they could be hand-placed per shot, where and when required.” In Limbo The initial brief suggested an 'ice hotel' look where everything was insubstantiall and faded out. Harry and Dumbledore were shot on a completely white stage. “This allowed the compositors to key it differently with Luma keys,” said Christian. “We did have to rotoscope some bits, but at least we had a better starting point than we would have had with a green screen shoot. The bounce was all white and matched the final look of the environment better. The look development of the platforms continued for several months. Christian said, “We played around with subsurface scattering, making it look like ice, trying different levels of refraction, but we never seemed to hit just the look they were after. We finally went back to our Art Department, led by Kevin Jenkins, and got them to produce some quick concept suggestions based on the renders that we had. Their new look was an instant hit with the director, and from then on it was easier, although it was some 40 shots and over five minutes of screen time. Bright Horizon “We started off using plans from the original Kings Cross, which we were building in parallel for our work on the last sequence in the film, but as the shots evolved we were directed towards a feeling of more infinite rows of platforms leading out in all directions. To do this we trimmed away any walls or arches that impeded the feeling of depth until we were left with just rows of columns. Trying to imply distance in a very white scene with a bright horizon line was one of the more difficult challenges since the light couldn’t really ‘fall off’ in the usual way. From the beginning there was the desire to create a kind of all-surrounding light, as if the environment was light emitting, and so we were working in a very narrow band of high values around peak white. Texture was being stripped away as requested, leaving clean planes of near white to try and imply a sense of depth. This was tricky and each shot had to be carefully graded to get the look we wanted. Stereo Sweet Spot All of their dimensionalising was done on the actors where the environment was wholly digital. This gave them very precise knowledge of where the actors were in space. “We then our body track or card was positioned on this point. “This gave us an accurate and consistent starting point for the amount of depth the characters had. Then it became a question of trying to hit a sweet spot that was approved by the stereo clients,” said Andy. “Many of the team hadn’t worked with the technique before and so it was an enormous learning curve, but very satisfying when the effort started to pay off. In terms of depth and convergence we had parameters outlined by the stereo clients within which we needed to work. After that we established a sign-off on varying types of shot and ported like-for-like values across similar setups.” New Generation Harry also shows the kids how to walk through the brick pillars while waiting for the train. Shot at Leavesden with green screens and partial set, the actors were rotoscoped and repositioned in the new environment, and then the artists animated slices, like an onion skin, to conceal parts of their body as they disappeared into the wall. Ripple and glow was added to the brickwork to tie the two together. The whole task could be done in Nuke. The platform environment was digitally extended, including some rendering and matte painting, and the whole of it was assembled as a photorealistic composite. |
|


