VFX Supervisor David Lee at DNEG talks about building out and developing remarkable new creatures, as well as some intriguing plot twists, for the final film in Marvel’s Venom trilogy.
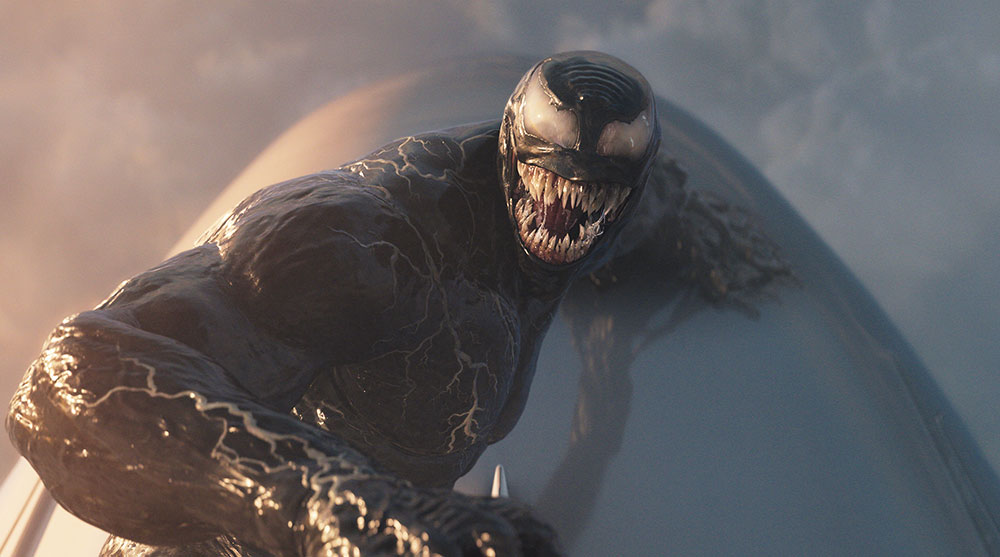
DNEG’s work on Venom: The Last Dance handed their team a chance to flex their character building, animation and FX simulation skills. Delivering just under 500 shots across 11 key sequences, the project encompassed the CG build and animation for the classic Venom and Wraith Venom characters, as well as some new creatures – the Xenophage, Venom Horse and the Green Symbiote.
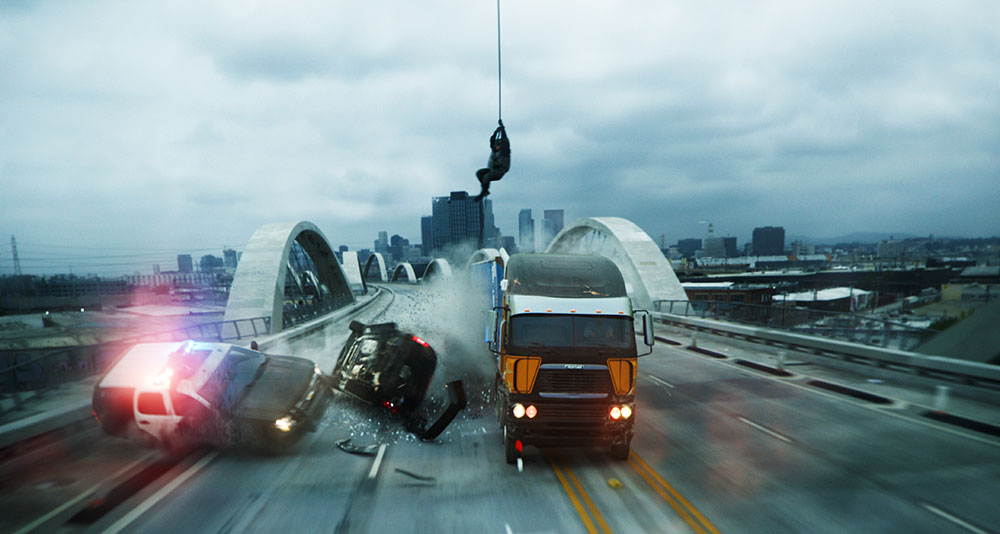
Together again, Eddie Brock and Venom are back on Earth, where Eddie discovers that not only he is a murder suspect, but he and Venom are being pursued by the Xenophage – a voracious alien sent by Knull, creator of the Symbiotes – and a research team from the US government.
DNEG VFX Supervisor David Lee talked to Digital Media World about the project, going through the team’s work in detail. DNEG came on board during pre-production, and David stepped in a couple of months before the shoot got underway, initially to begin moving character designs from concept into production-ready assets. The team continued through post, working on the film for nearly a year and a half.
DNEG had worked on the previous two films in the Venom trilogy. “On a technical level, nothing particularly new was required from this project that hadn’t already been established,” said David. “So it came down to taking everything we had learned from the previous shows, and improving on it. We had more time to finesse looks and performance, rather than having to create the full series of set-ups from scratch.
Updating the Pipeline
“Although our pipeline had continued to develop since the last film had been delivered. Porting the model and texture work over was fairly straightforward, but we needed to rework elements of the assets to accommodate the pipeline updates. However, at least we knew where we were going. Creatively, Venom is already a defined character within the context of these films, so we didn't need to make any large-scale changes, but just focussed on certain adjustments to ease the challenges we had encountered in the previous films.
“For example, whenever we needed Venom to appear relatively small in-frame, we made a variant allowing for more break-up in the specular to prevent any broad reflections from overwhelming the asset and affecting the scale.
“The re-creation of Wraith Venom, on the other hand, was more comprehensive. The head model shape had changed between the first two films, so we devised a way of dialling in the changes with our Production VFX Supervisor John Moffatt and Director Kelly Marcel to arrive somewhere in between the two.”
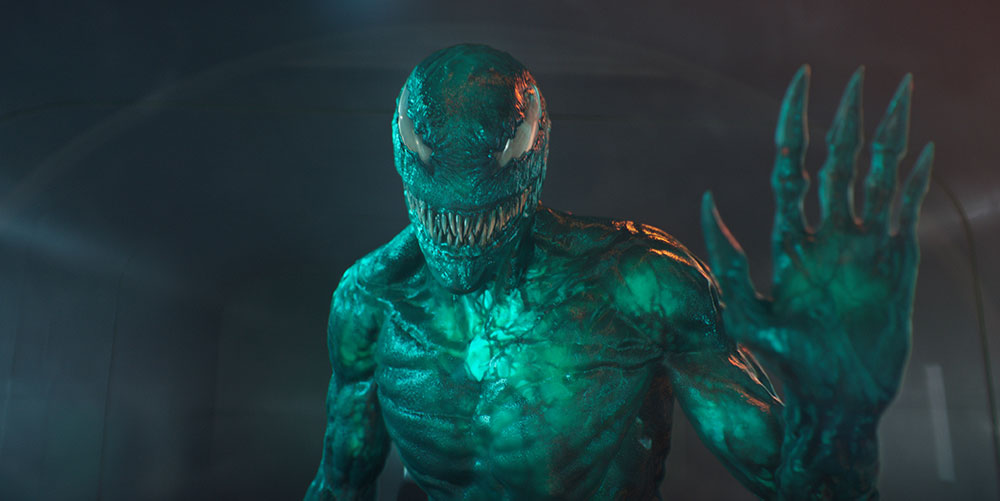
Green Symbiote
‘The Last Dance’ features a number of completely new characters including the Green Symbiote that DNEG worked on. Its initial concept gave it a distinctly different look compared to the other Symbiotes – something quite striking via a translucent appearance that also allowed us to show aspects of the internal structure and vascular system. David said, “We took this idea and, avoiding a glassy sculpture-like look, added complexity with a rougher surface. We dialled in iridescence onto the torso, giving it a cyan shimmer as it catches the light, as well as a subtle, almost frosted quality onto the exterior.
“A different style of movement was also called for. Adding a tail that split into multiple lengths was key to this, and allowed the animators to lean into a smoother, hypnotic type of motion. Similar to a snake's movements, it is calm and slow, and belies the power he could unleash if he so desired.”
Insectoid Monster - Xenophage
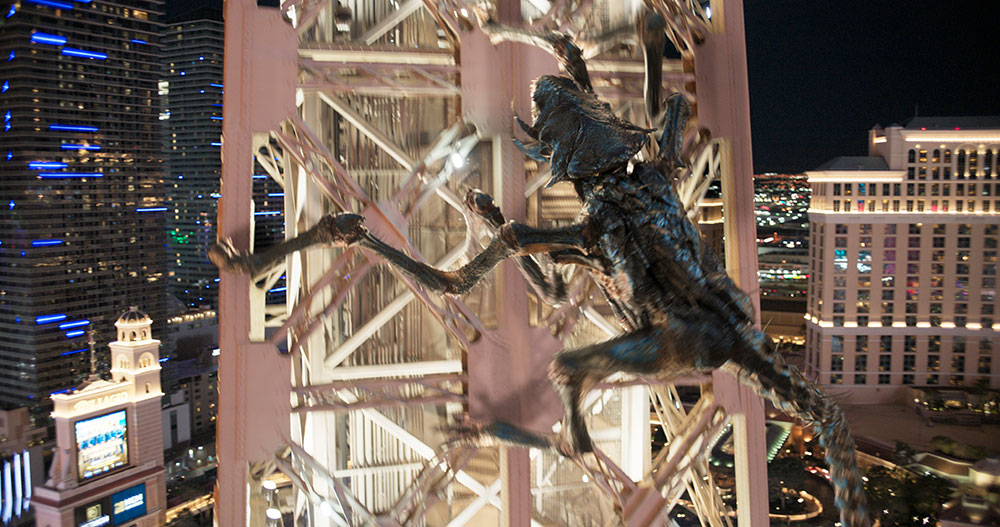
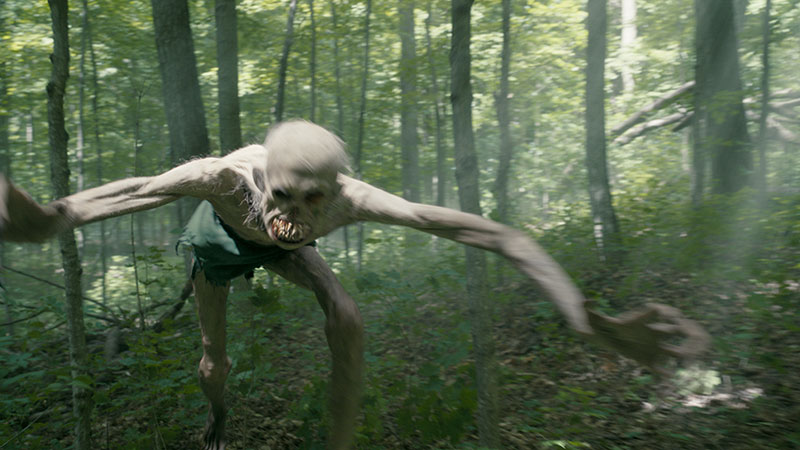
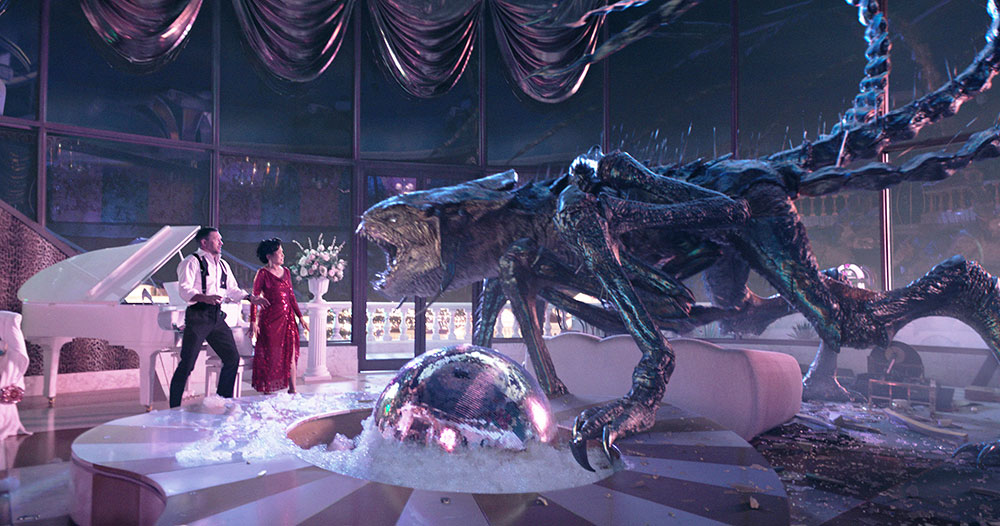
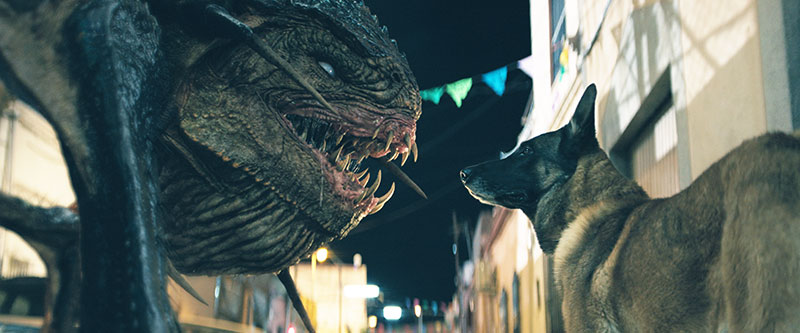
Development of the Xenophage, an utterly different creature to the Symbiotes with articulated legs and powerful jaws, started early in the post-production process, as they knew it would be a major new character within the Venom universe. Starting with an initial concept, they iterated on top of that, drawing inspiration from various animals ranging from praying mantises and crocodiles to snakes and porcupines.
“These iterations evolved into something we could then pass to our build department to create 3D sculpts in ZBrush, followed by a quick rigging process so that the animation team could start motion studies within a sequence we mocked up internally. Given its unusual physiology, through this step by step approach we ensured the Xenophage would keep a sense of grounded movement that felt organic and realistic,” said David.
They focussed on various insectoid movements to give it a staccato motion, with limbs and head movements that were almost mechanical, as seen in some larger beetles and spiders. He said, “As the animation team worked through their motion tests, we fed the results back into adjustments to the model itself to ensure everything worked correctly, before updating to a fully functioning rig for the final asset.”
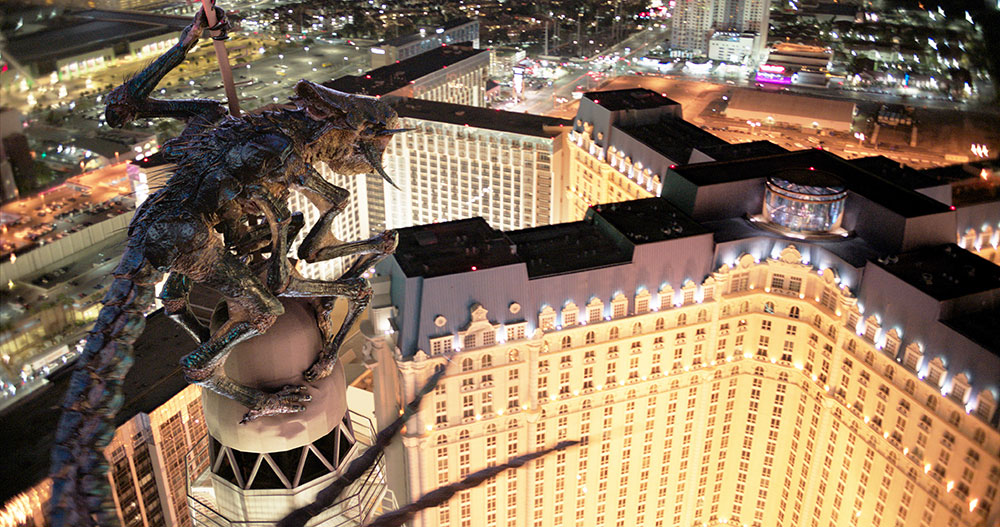
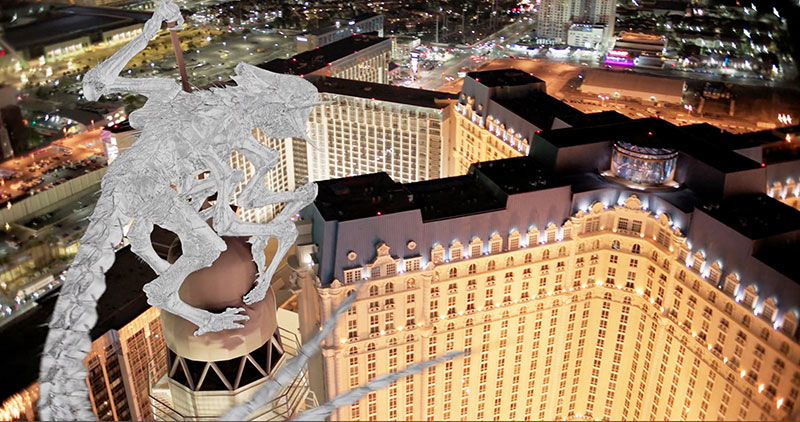
Not surprisingly, several interesting challenges emerged when developing this character, specifically, the act of motion itself. Because development started from a visual point of view, the creature’s articulation could only be designed once the base look was more defined. It was important to run the asset through animation as quickly as possible, making adjustments to avoid biomechanical issues while trying to limit changes to its look.
The two main challenges both related to the leg articulation. David said, “We found we needed to increase the hip width to accommodate the tail, which could split into three, as well as allow the two rear legs to articulate correctly. Furthermore, the shell was originally one piece but caused problems when hinging the legs at the top joint. It was split off into smaller sub-shells along the top of the legs, allowing the range of motion we needed.
Taking Venom for a Ride
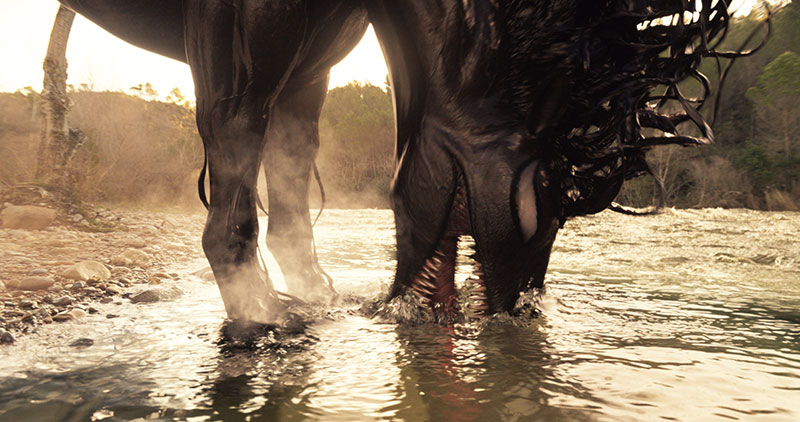
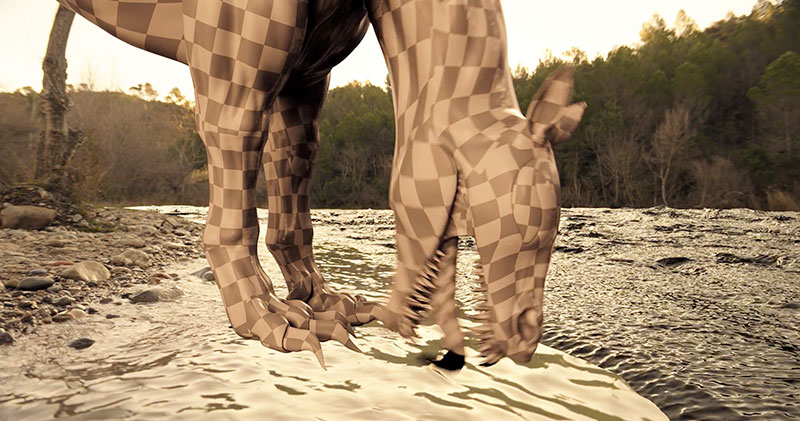
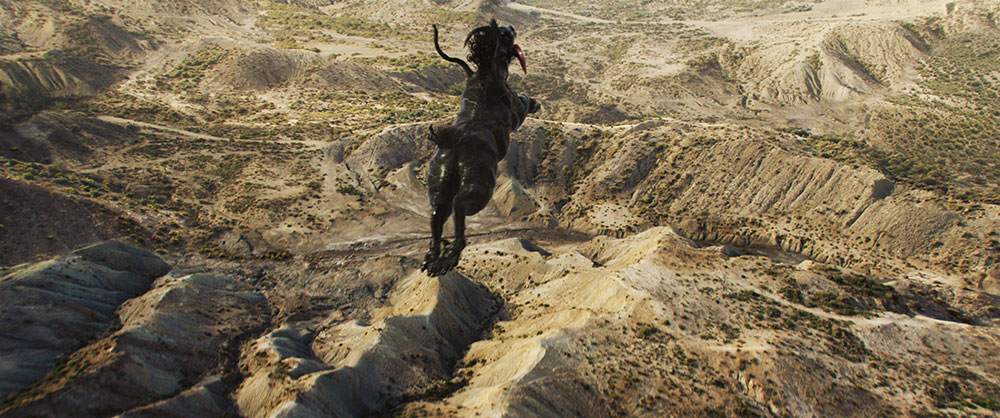
At one point in the story, Venom takes over a horse. DNEG based it on a real horse to give the audience a recognisable starting point, and then brought in the Venom-esque features such as the rows of irregular teeth and large, white eyes. “Venom is always a much larger character than the characters he has inhabited, but Kelly really wanted to emphasise the size and power of the Venom Horse, so we ended up even a little bigger than our references on set,” David commented.
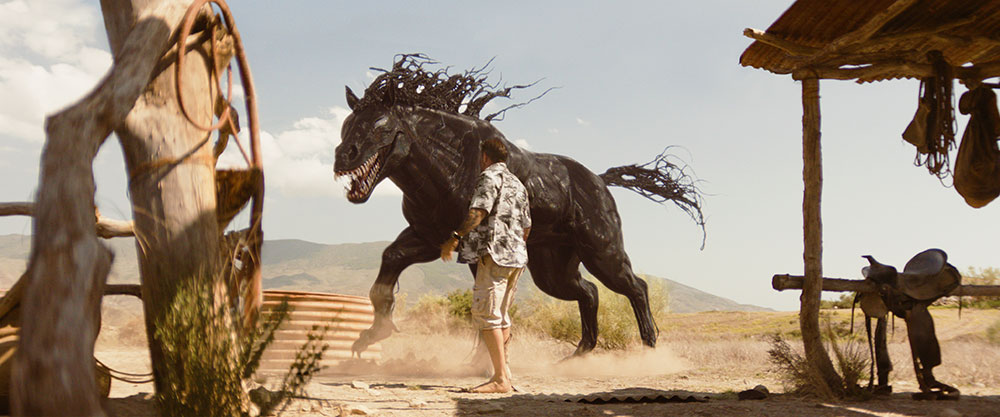
“This also gave us an opportunity to really bulk up the muscle mass and give it a nice powerful ripple when in motion. The mane and tail were tied into Wraith’s look, creating a mass of tendrils that could mesh together when they collided, giving a lovely liquid feeling to their behaviour, similar to Wraith’s connecting tendrils that attach to Tom Hardy's back.
“The live action horse actually gave us some great performances that were very encouraging when looking at the raw plates. Capturing elements in-camera is always preferable as a first approach in any case. But, as we developed our animation and timings for it further, we knew we would have to build a more substantial asset than the tracking model we were using. We needed more flexibility to hit the narrative within the confines of the edit.”
So, they made the decision to build a digital replacement for the horse early on to free their hands when developing these shots. But as with any digital work, having the real horse as a reference, even if they didn't use it in shot, was of immense help when animating and matching to look into.
Into the Black
Mentioned above, Wraith Venom – essentially a head attached to Eddie’s back via tendrils – went through a partial re-design for this movie. “Taking scenes from the previous film as a starting point to make sure we matched the look and feel, we recreated them using our asset, updated to reflect the new design,” David said.
“We then dialled in changes to the performance of the FX tendrils and the look of Wraith himself based on feedback from John Moffatt and Kelly Marcel, our director. The rest of Wraith is FX driven, requiring a complete re-do. One thing we added specifically for this film was a subtle sense of iridescence to give an additional layer of complexity, which played nicely in the daylight scene in particular.”
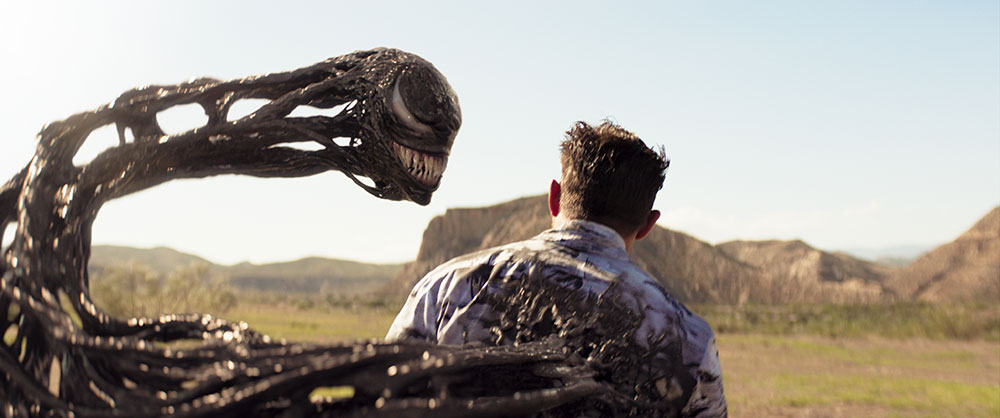
The intention was to prevent Wraith Venom from feeling like a black void in daylight scenes. They looked at imagery of oil as reference, but without any reflections, it was almost like peering into a black hole. It can look very unreal, which they were very consciously avoiding.
David said, “As Venom’s lighting is driven primarily by reflections, in a desert with only the sun as a single direct light source, it meant that we wouldn't necessarily get all of the detailing and shaping on him that we were looking for.
“We started adding multiple, smaller light sources, but biasing them towards the key light direction to keep to the lighting on the plates. This gave us the improved form and detailing, allowing him to keep a similar aesthetic to the previous films and not just losing him to one large, hot reflection coming in from the IBL. The increased specular points of interest gave us nice, tight highlights to illustrate the wet, fluid nature of Wraith, which we combined with a soft subtle bounce to help him form without flattening him out from broad, bright sky reflections.”
Tendrils
The distinctive tendrils for each Venom character were all controlled and developed in a similar way. The artists rigged up a tube – only defining the length, thickness and overall motion broadly at this stage – that the animation team could then use for the performance, and show to get sign off from production. This tube could also be attached anywhere on the character's body depending on where they wanted the tendril to emerge from, as well as multiple instances if required.
The animators’ work would be passed to FX to run their fluid simulations on top, as well as an extra ‘connection’ pass which gave the team the defined spread of smaller tendrils where it attaches to the body. FX also came up with methods to create more complexity within the tendrils, allowing them to split off and rejoin, adding webbing to them and so on to reduce the need to go back to animation if they had additional notes on the look of tendrils.
Animation
The animation techniques the artists used varied across the range of creatures and characters – traditional keyframe animation for the Venom Horse, Xenophage and Green Symbiote creature, and motion capture for the bulk of Venom’s performance.
David said, “We didn’t consider motion capture on the horse as it was only briefly seen as a digital character in a couple of shots. For Venom, however, we decided pretty early on that mocap would benefit his performance, and not just in the dance scene with Mrs Chen. We knew it would give us a more refined base, faster than classic keyframe animation. So, under the direction of our Animation Director Chris Lentz, the animation team utilised DNEG 360’s mocap stage and captured all the material they needed for the relevant scenes.”
Venom on the Dance Floor
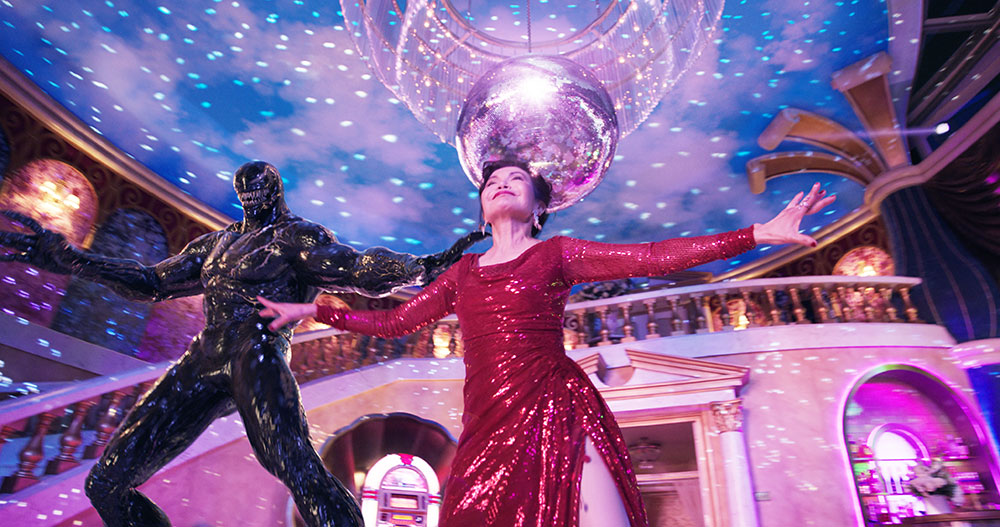
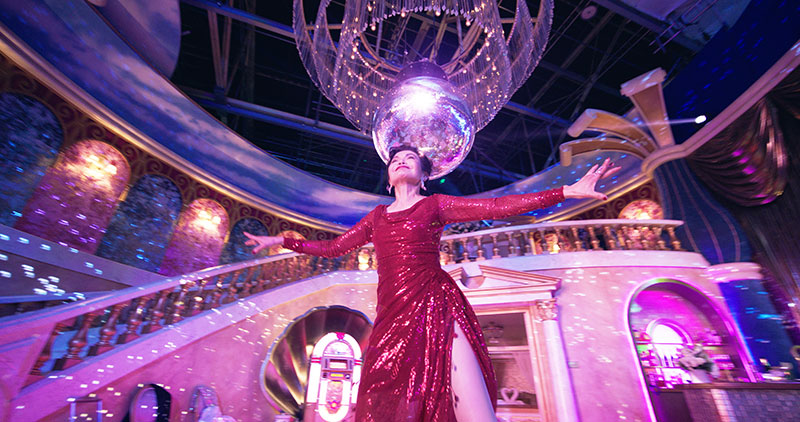
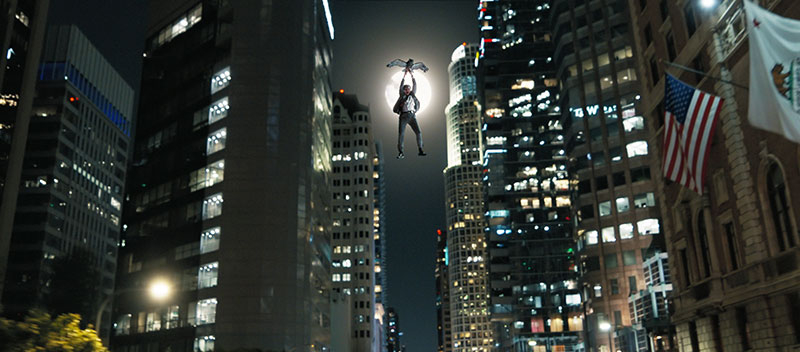
Handling of Venom's dance sequence with Mrs Chen was definitely special, and had to be done in multiple steps. “We had a wonderful choreographer who developed this scene. It was filmed on the stages at Leavesden, but we did some motion capture tests beforehand to test eyelines and ensure they were being staged correctly to accommodate the size difference,” said David. “The set itself was fairly extensive and was designed with a retractable ceiling to accommodate the wire work for Mrs. Chen when she is lifted up to the balcony by Venom's tendrils.”
For the shoot, Venom’s stand-in dancer was around 6ft tall, although Venom is another foot or so taller than that so he wore an eyeline guide on top of his head.
“The distance between performers was really important to allow for Venom’s size and scale. We didn’t want his arms to be forced close to his body and look unnatural when it came time to animate. The dancers needed to constantly keep Venom’s true stature in mind throughout and place themselves accordingly. The stand-in wore extendable forearms to dance with as a guide for his reach, particularly around the environment, as well as giving Mrs Chen something to hold on to when they were interacting with each other,” David said.
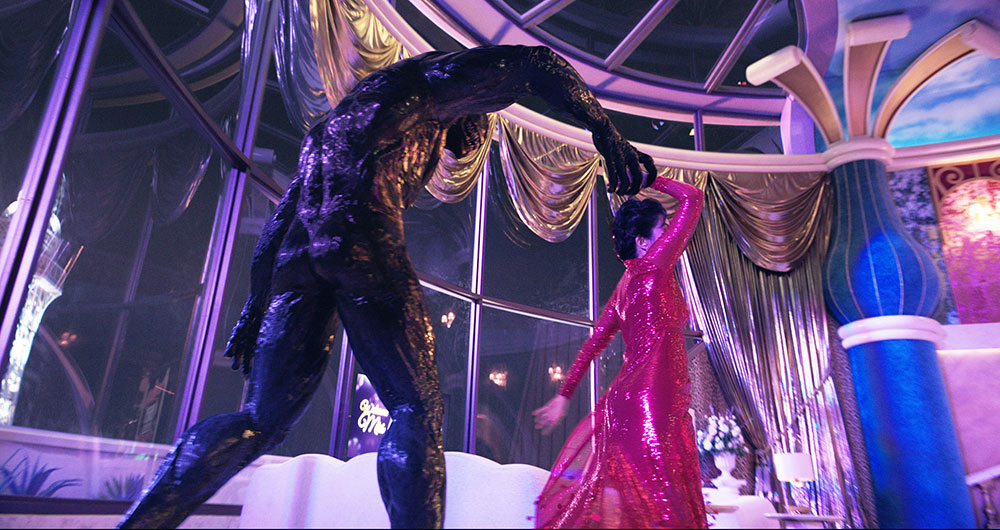
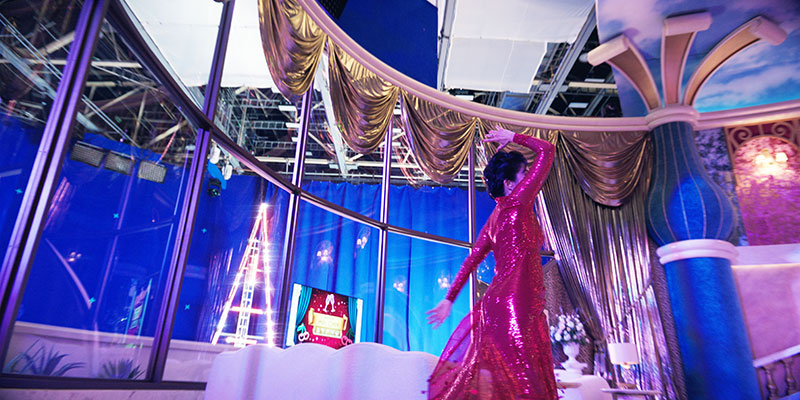
“We would shoot two versions of any shot with Venom – one with the stand-in performer and one without, so we always had a reference of the two performers working together. On average, I would say we used the versions with the stand-in dancer more often than not, but the paint team still found the clean plates immensely valuable, when removing our stand-in.”
Dance Animation and Motion Capture
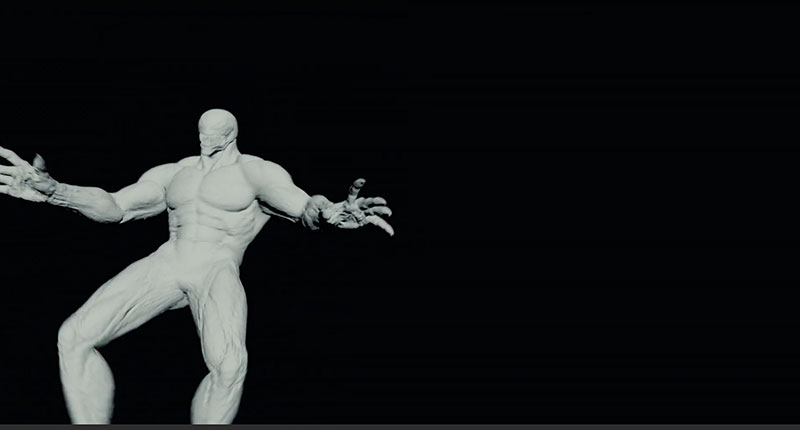
Instead of capturing any motion on the day, after the shoot, once they had selected their takes from the sequence, a dedicated mocap session was held to provide data and reference for the final CG Venom. “Our stand-in dancer returned to perform the dance, and the motion data was then split up and matched into the relevant shots,” said David.
After tidying up, the animators could focus on adding secondary performance animation such as the eye/mouth shapes and any hand work that was required. The prep we had done to ensure the staging was working correctly really paid off, particularly in any shots requiring interaction between Venom and Mrs Chen, and made the sequence fairly straightforward to put together.
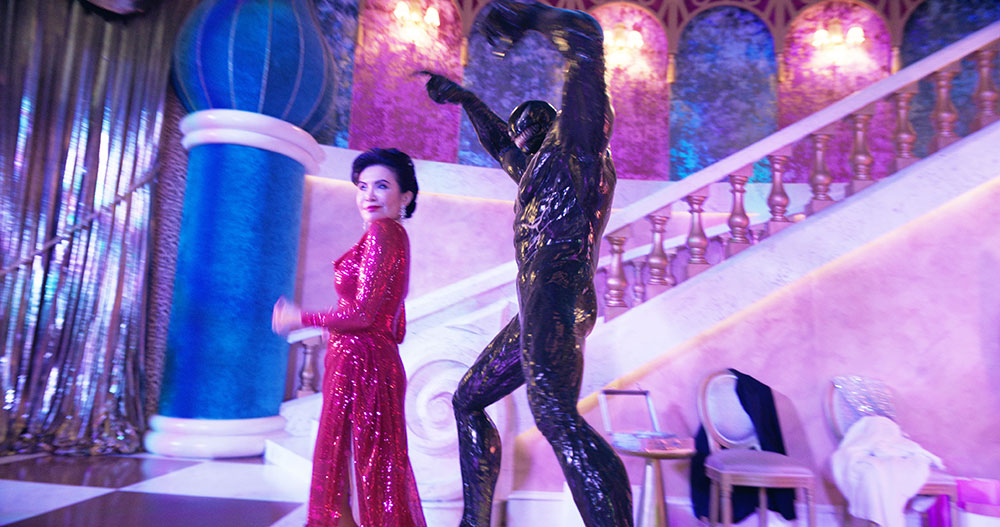
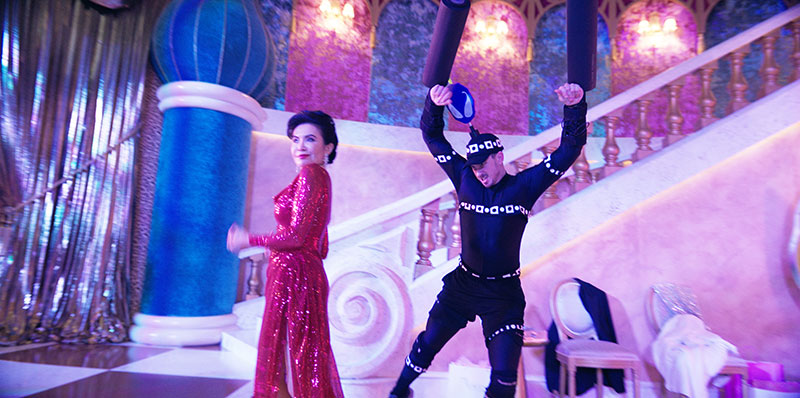
“Initially, we thought we would have to apply a much greater sense of weight and slower speed for Venom’s character compared to our dancer’s performance, but it became apparent looking at reference material of dancers that these big guys can be pretty light on their feet,” David said. “So we kept Venom a little bit pacier than anticipated, and let the contrast between his normal style of movement compared to his dancing add to the humour of the situation. We just made little adjustments where required to prevent him from feeling too light – it was a fine balance.”
Two Caches – Symbiote Transformations
An important aspect of the Symbiotes is the transformation between their host and Symbiote forms. For DNEG’s team, these transformation simulations required a lot of crossover between the animation, creature and FX departments. Animation began the process by blocking out the base creatures' performance, followed by the target creatures' performance. These two caches needed to be aligned in scale due to the substantial difference between the Venom creature end state and the base character.
This way, the smaller character was scaled up over the course of the transformation, while the target was scaled down to the base creature's size initially, and then scaled back up to its final size over the transformation. David said, “The FX team ran their first pass to see how the timing worked, and fed back any adjustments to the animation team so they could then start confidently finessing their work, knowing things would be lining up correctly.
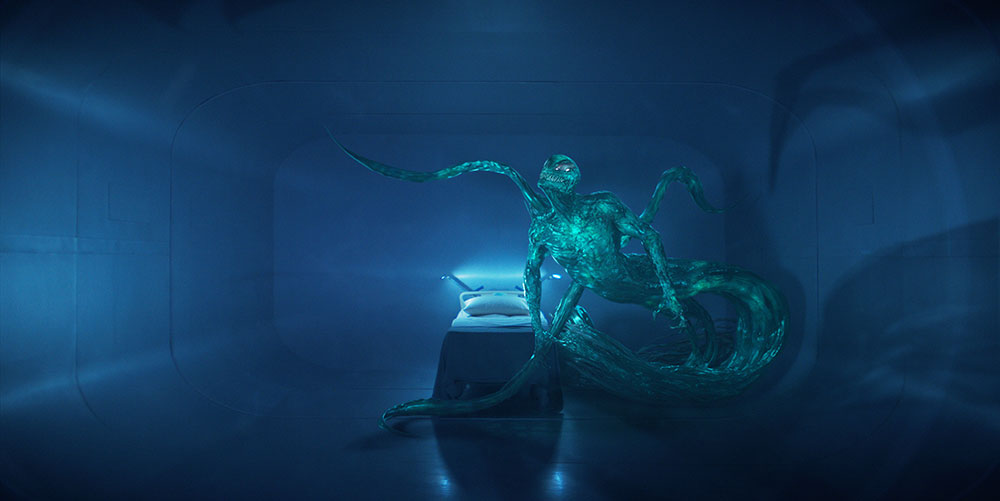
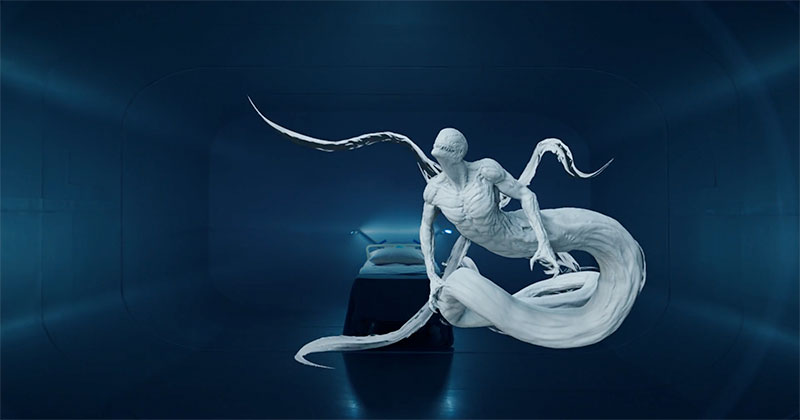
“From there, the creature FX artists worked on each of the two caches for the muscle, which would be fed back in through the FX. Finally, they also did a post-FX pass to tidy up any areas requiring cleanup. Everything was rendered out in depth, so that the compositing team had the flexibility to work the multitude of layers correctly with the control they needed.”
Though complex, this approach meant none of the talent were required to wear tracking markers, suits or prosthetics, nor was previz used for the shots. Houdini was used for the FX work, augmented with proprietary DNEG tools utilised within this work.
Venom and Eddie Face to Face
An especially important transformation for DNEG to visualise was the split-face effect between Eddie and Venom. Like the other transformations, it demanded a lot of inter-department hand-offs. David feels that one of the main purposes of this effect is to drive home the idea of Eddie and Venom working together. “There is a fun moment in this film, where they do initially stumble over each other as they say their ‘We are Venom’ line, which gives a little nod to how they are still two entities who have been gradually learning how to work with each other over the past two films,” he said
“Since we didn’t need to attach markers onto Tom Hardy, he was able to give his performance without any demands or restrictions from us. This recording went to our tracking department and, once we had an object track for his face, we could parent Venom's cache onto it, allowing Venom's overall head movement to match into Tom’s performance. From there, any secondary animation for facial performance was added. It then passed onto our FX team, who did a pass on the fluid sims to pull the desired half of Venom's face back to reveal Tom, or vice versa.”
Once they had this first pass and had the timings and overall scope of the effect dialled in, creature FX stepped in to sculpt and finesse the shapes, and smooth out any problem areas.
Then, it was handed back to FX for a final pass of detailing before finally passing it on to the lighting team, where it was output in multiple layers so that the compositors had more granular control over how they wanted to integrate the different components, such as subsurface veins vs surface veins, into the final shot.
Aerial Attack
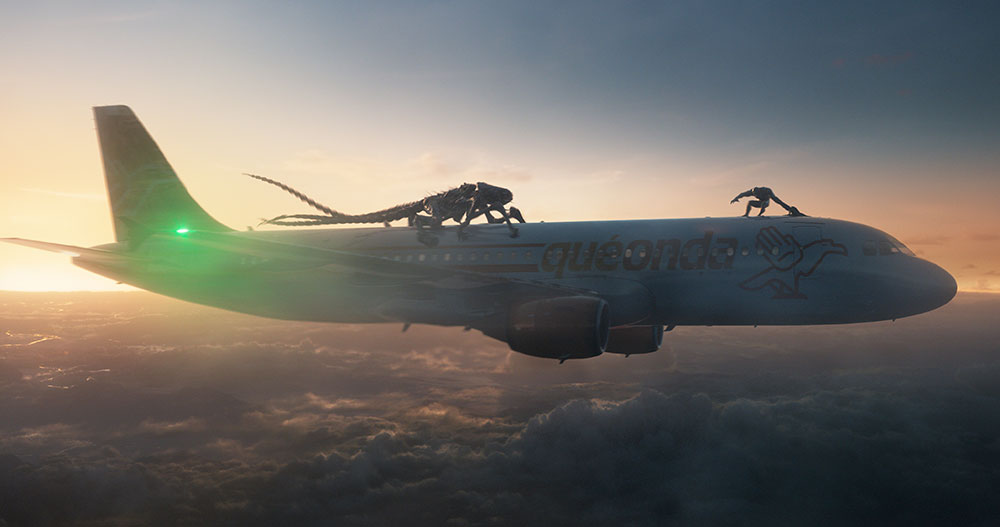
Early on in this story, Eddie and Venom need to reach New York City as quickly as possible. Attaching themselves to the exterior of an airplane headed to New York, the Xenophage tracking them suddenly attacks, and they are forced to dive down into the Nevada desert.
“Some of the sequence was actually shot in the studio,” David said. “We had a partial section of a real plane that we used to shoot Tom Hardy hanging off the side as he transforms, and a number of window shots reveal the reaction of a passenger inside. These gave the actors reference and physical feedback for their performance.
“But we always knew that, given the extremity of the environment we would be adding in post, we would require the greater control working digitally would give us over such aspects as reflections, lighting and the character interactions as they fight.”
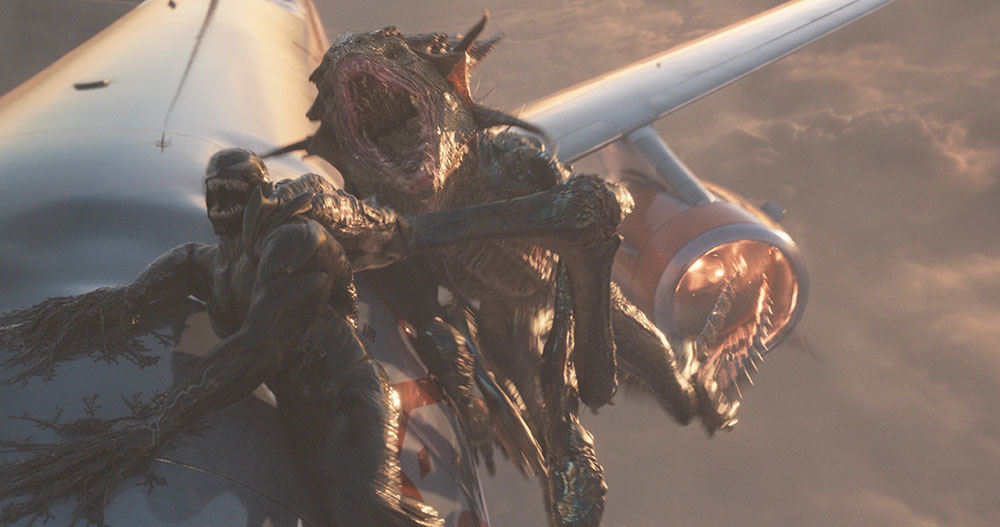
A primary challenge here was conveying the sense of speed and peril from the fight, especially in shots lacking strong visual cues for velocity. David remarked that at 550mph, it would be a struggle to simply be up there. The team also really wanted the environment itself to play a part in the action, and to help lend credence to how Venom finally dispatches the Xenophage for this initial encounter.
He said, “For speed reference, we ensured that every shot included elements to showcase the rapid movement. For instance, the thick, dense layer of clouds under the plane worked in a number of shots where they were visible. Even so, the distance between the plane and the clouds at cruising speed didn’t give us that essential sense of travel, so we introduced additional wispy clouds that the plane passed through. This layer also contributed to subtle reflections and flickering effects on the plane's surface.
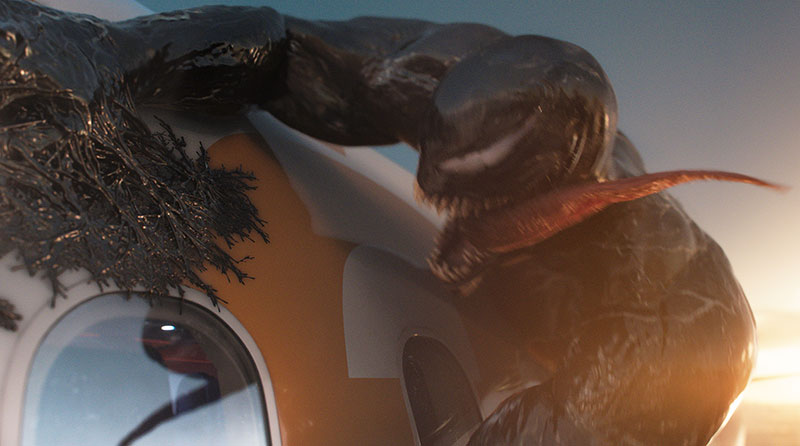
“To convey the physical impact of the wind on our characters, we applied a cloth simulation to Venom's body, creating ripples that mimicked the effects of high-speed wind on skydivers. Similar creature FX were run on the Xenophage’s spikes and any patches of looser skin that we felt would realistically be affected.”
Animation also accentuated the sense of wind via strong poses showing the characters keeping low, leaning into the wind, with limbs getting swept back before pushing forwards, to keep selling how hard it would be to move against the direction of the wind. Finally, they added a low-frequency rumble and camera shake to mimic a sense of buffeting. www.dneg.com
Words: Adriene Hurst, Editor
Images: Copyright: Courtesy of DNEG © 2024 CTMG, Inc. All Rights Reserved.


