
Artists from Digital Domain talk about designing, building and animating the transformation of an agile, running man into a stumbling, long-legged creature – ready to haunt your nightmares
The recent IT: Welcome to Derry television series, streaming on HBO, serves as the prequel to the IT franchise of horror films. Like most true horror stories today, the kind that lurk in your darkest nightmares, this production came with a wealth of opportunities for edge-of-your-seat VFX, from terrifying characters to grim, haunted environments.
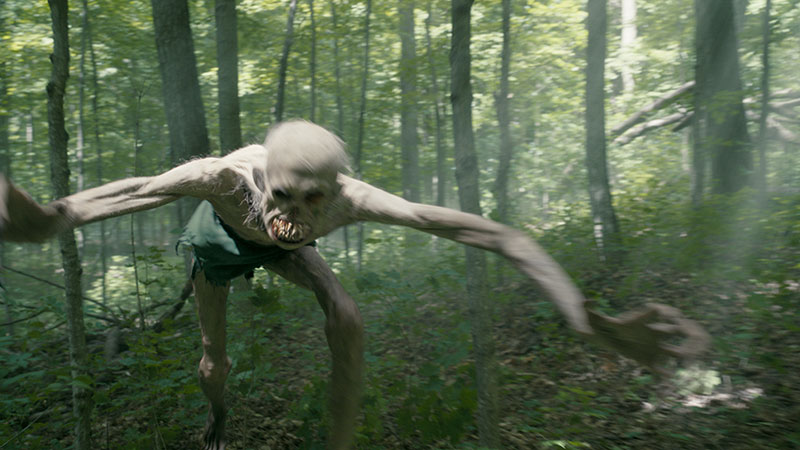
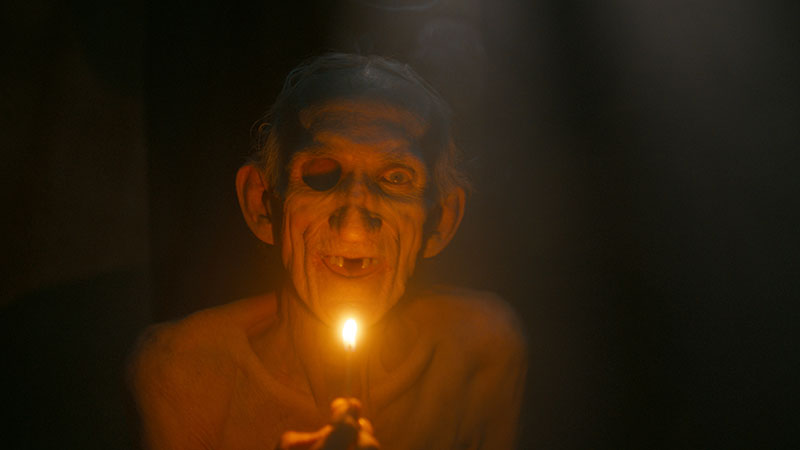
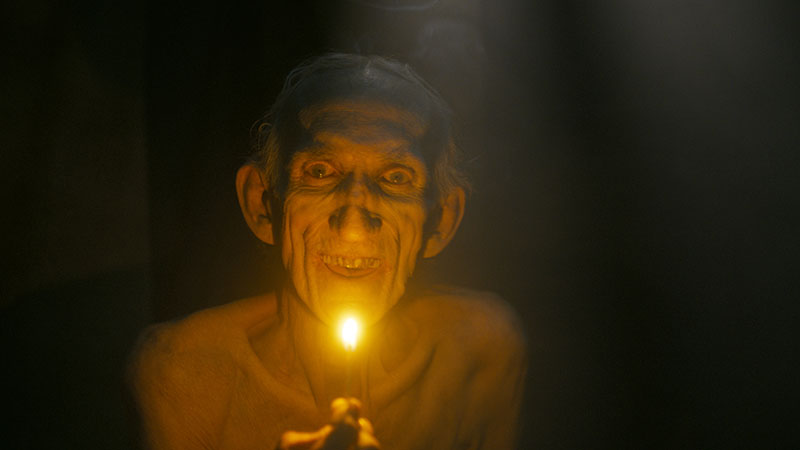
VFX Supervisors Mitchell Drain and Nikos Kalaitzidis from Digital Domain had the job of conceptualising and completing the creature design for the Skeleton Man, who first appears during a sequence set in a carnival freak show. Collaborating with HBO's Production Supervisor Daryl Sawchuk, Mitchell and Nikos present a frail old man, who soon undergoes a transformation into the ghastly Skeleton Man during an intense chase through a shadowy forest.
The visual effects team handled character design, animation and compositing to create this unsettling figure, enhancing the horror atmosphere that defines the narrative.
Building on the freak-show setting as the sequence begins, we see the old man light a match to reveal a missing eye and teeth. Digital Domain’s artists removed the actor's eye, hollowed out the socket and reconstructed his mouth to account for the missing teeth. Frame-by-frame, lighting was integrated in compositing so that his eye socket and distorted mouth felt physically present in the live-action scene.
The Man Inside the Creature
Reference was essential to fully transform the actor into Skeleton Man, because one of the team’s main challenges was preserving and integrating the actor's likeness while transforming him into a terrifying creature. The artists started with a 2D concept illustration from production and a photo reference of the actor. From there, they sculpted a lifelike 3D creature whose design and movement evolved dramatically as the sequence progressed. Their task proved to be complex but exciting for the artists.
Mitch Drain noted that it was important to the client to keep a connection between the old man, played by actor Peter Schoelier who is known for his extreme looks, and the Skeleton Man. “We started with a full body scan of the actor and concept art of the final character, using the scan as the base for the Skeleton Man, and adding and subtracting as needed. From an animation standpoint, the early stages of transformation incorporate the gait of the actor to also help link the two together.
“A fair amount of evolution happened during shot production as well, to hit the right horror notes,” he said. “Early on, the Skeleton Man was intended to have a popping, staccato motion, reminiscent of a contortionist, but since this drew the character further away from the human connection with the old man, we altered it to feel more like human movement.
Organic Evolution
The goal was to make the whole process feel more like an organic, logical evolution than a sudden change. “For example, we created a very subtle moment in a wide shot where the old man loses his balance while chasing the boy. When he regains his balance, he is significantly taller and has a longer stride. It is a moment of ‘did I just see that?’ that may elude some viewers but later, more obvious changes occur. The feet enlarge and he loses his shoes. The skin changes colour, all building up until the moment he drops onto all fours and completes his transformation.”
Bizarre and grotesque, the creature depended on the collective work of Digital Domain’s modellers, texture artists and riggers, with shot-specific modelling and muscle simulations to enhance the realism. The modelling team sculpted the face and body, and the texture team executed a dedicated fidelity pass to accommodate the distorted anatomy. The grooming team also added custom hair and surface detail variations for specific shots, contributing to the creature's disturbing, yet highly realistic appearance.
Digital Domain’s proprietary tools proved invaluable. Samson was used to create realistic hair and peach fuzz, applied in varying densities across the body. This project was also one of the first to take advantage Gen Man 2.0, their updated base mesh system for human-like characters. The actor was scanned on set and the Gen Man 2.0 topology was applied to this scan.
Twisting the Topology
Talking through the details here, Head of CG Bob White said, “We started by wrapping the Gen Man 2.0 mesh to the scan of the actor. We then deformed that mesh as close as we could to our final transformed version, but made some heavy changes along the way to accommodate the extreme distortions to his mouth/muzzle area and to areas like his ears, where we had to take the large ears of the actor and reduce and reshape them.
“We tried to maintain the original topology for as long as possible and even had layers of it as an underlying deformation for some of the more intricate geometry, like the portion of his lip with the holes and the rims around his missing nose. Obviously, for the full transformation we have a whole new topology, but our base mesh was able to get and stay pretty close to a lot of it.
“In a lot of cases, we have to build in controls for the artists based on the needs of the character, but Gen Man is a really solid foundation to build those on top of. It gives us generic performance shapes as a launch point, and a lot of fine motion controls to animate and tweak the base mesh in non-destructive ways.
In this case we had to do an ultra high fidelity pass for the textures and groom because the character grows so much as he distorts. We went back in and added new detail into all the textures around his face, hands and feet in particular to allow a lot of the micro details to hold up to the extreme distortion of the geometry.
Base Mesh System
Bob also took a little time to tell us about the updated Gen Man 2.0 software. Its improved eye topology, UV layouts and higher-resolution mesh has resulted in greater flexibility in rigging, as well as more detailed muscle deformation and skin simulation. It was especially helpful in capturing details in the neck and shoulders, instead of relying on textures alone.
Bob said, “Gen Man 2.0 is a complete geometry overhaul to our base geometry system. The original Gen Man already had pretty solid topology and some decent faceshapes as a starting point for any human digidouble, but we added a lot of topological fidelity into all the areas where we found it consistently fell short. The eyes got an overhaul on their various lenses and the tissue around them as well as standardising some of the UV positioning for easier texture masking and so on.”
When it comes to UV layouts, Bob commented on the on-going challenge of finding the balance between UV fidelity and memory loads. “We use a lot of different, specialised UV sets for our character work – we have one for anim visualisation that’s all one UDIM, one that’s specific to the groom artists’ needs, and various others for texturing/surfacing depending on what we need.
“Having at least a solid foundation of what each of those is and locked naming conventions speeds up everyone’s workflow. Now with Gen Man 2.0, the revised UV flow gives more fidelity out of the same UDIM count as previous iterations.”
Skin and Bones
Muscle deformations and skin slide were hugely important to Skeleton Man’s overall believability – even more than they are to any humanistic CG character. “He is extremely thin, with little muscle mass. Since the scenes were quite kinetic, we had to be careful not to hide the muscle under sliding skin and motion blur,” Mitch said.

Skeleton Man: Concept
“We took a more art directable approach, using shot modelling to enhance muscle movement and isolate to read better beneath the skin. It is a painstaking, per shot process that would need to be re-done as the animation changed but, in the end, it gave us the best results.”
An Actor, a Creature and Three Rigs
The Skeleton Man's animation, led by Animation Supervisor Ellen Hoffmann, was especially interesting and played a key storytelling role. Early on in his development, his movements showed twisted limbs, unnatural rotations and contortionist-inspired poses, before the animators shifted into a style that fit naturally into the shots. All animation was performed in Maya.
The client supplied the team with reference videos to guide the creature's motion. Inspired mainly by feline predators, meanwhile the artists needed to preserve the actor's own way of moving. His transformation over time was achieved through subtle, technical animation work, requiring the animators to blend three distinct character rigs that each represented a different stage of the process.
These versions had to be synchronised but move at different scales, keeping the head size consistent and scaling the limbs independently. Therefore, timing was critical – the transformation occurred mid-motion, while the creature was moving forward at a rapid pace.
Scaling the Limbs
Ellen said, “Scaling the limbs independently meant we had to make sure the character stayed balanced and physically believable at every moment. Nevertheless, at the same time, this approach opened up a wide creative playground for pushing shapes, proportions and movement in exciting ways.
“He starts out in a straightforward run before the transformation takes hold. Once the shift starts, we could let his body collapse forward, making him stumble and drop into a more ape-like gait. All versions of the rig needed to be able to perform the same core motion, letting the team transition between them at any moment.”
Not surprisingly, Bob White commented, “Anyone who works on a character or creature with groom that scales won’t hesitate to tell you that it’s something you should never do. It’s always a rough experience. Chasing the texture fidelity and animated groom scale across limbs was a very delicate balance of checking, testing and running multiple iterations in every shot.”
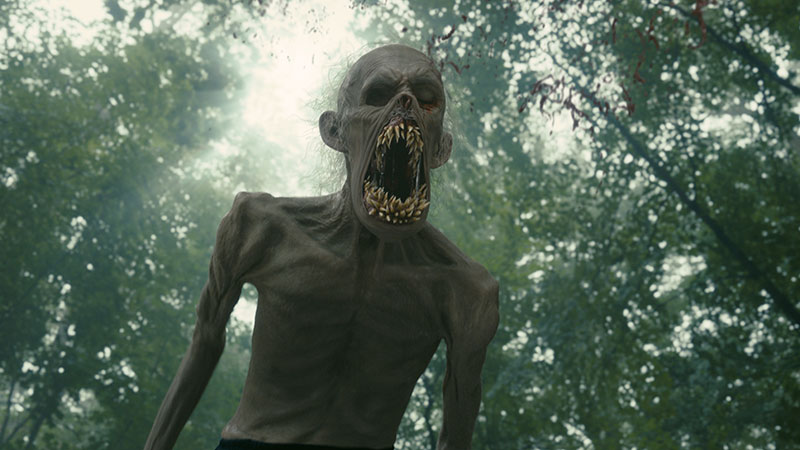
Because the transformation unfolds directly in front of the camera, Ellen’s team had nowhere to hide any part of the process. “Everything happens quickly as he moves toward the lens. His head begins to reshape while his mouth opens into a wide roar,” she said. “Our character’s metamorphosis had to feel both clear and impactful – shifting from a light, agile, running man into a stumbling, heavy, long-legged creature with a completely different sense of weight and motion.”
Compensation
The teams had to compensate for the multiple scales in all areas of the asset. The rig required extra joints and controls to allow for joint and mid limb deformations. The animation team continuously overcranked the moves and had to dial back incrementally when the geometry became too deformed to be salvaged.
The shot-model team was constantly revising and pushing the muscle jiggle and skinslide to compensate for the deformations. Groom artists had to revise and tweak grooms to suit the growth, and meanwhile multiple render iterations of all his stages of transformation were needed to give the compositors a chance to push and finesse the creature into place.
Animating three different characters throughout the transformation especially helped manage the disparate topologies on the face, calling for a version that rode along through as much of the deformation as they could handle.
“The actor has such a great look of his own that the mandate was always to keep as much of him in there as possible through the transformation,” Bob said. “There are notably a few points where we maintained the likeness for specific key frames within the transformation. His distinctive ears and nose were preserved as much as possible because they tied us back to the actor.”
Rotating Teeth
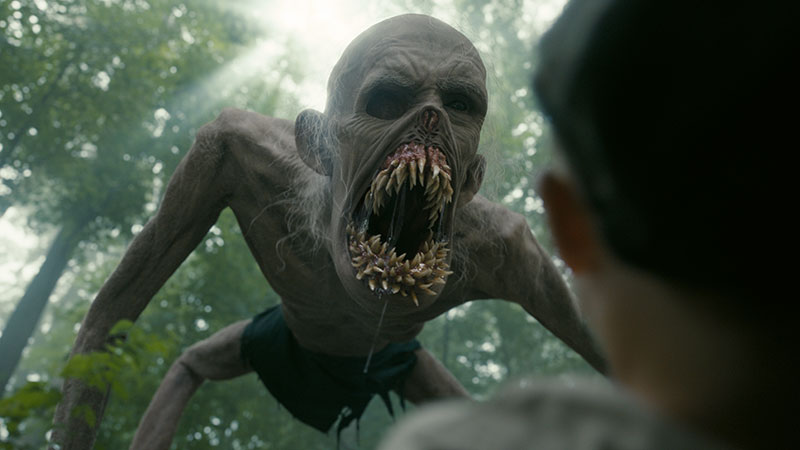
About that wide roar – Skeleton Man’s awesome mouth is an integral aspect of the overall design and a common element in the IT world. It often appears in Pennywise and now, the thematic element of the teeth runs through Skeleton Man as well. Mitch said, “The concept design gave us a good basis for the creation of the mouth. We needed to tailor the composition of the teeth to actually fit within the model.
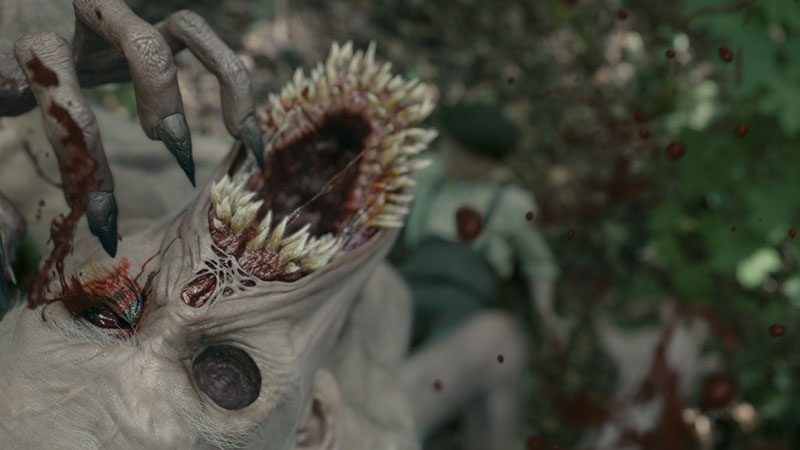
“Although almost anything is possible, we still needed to avoid interpenetrations and keep the form believable. It was necessary to create an animation rig to allow the teeth to rotate forward and back, almost like a flower blooming. Doing this allowed us to control the overall shape within the mouth and highlight the teeth as needed, without having them poke through the skin. A bit of gross, stringy drool FX did the rest.”
Lighting and Compositing – Where Art Comes into Play
Skeleton Man’s final form needed to be meticulously lit, composited and rendered in multiple passes to integrate invisibly with the live-action plate and uphold the audience’s belief in what they were seeing. Compositing was used to highlight key details and enhance the overall visual quality of the shots. Working under compositing supervisor Randy Ruan, the team went through numerous iterations to finalise his look, paying particular attention to skin tone and texture.
Varying lighting conditions during the forest chase shots added complexity to this task. To maintain visual consistency, the compositors collaborated closely with the lighting department, carefully balancing light and shadows.
Illustrating how digital Domain’s departments worked together on this spooky character, Mitchell and Nikos recalled a special shot occurring as the chase gets underway. A close-up of Skeleton Man's back during the transformation, the artists had to very carefully blend the live-action plate of the actor with the skeletal CG version of Skeleton Man. His performance involved complex animation and significant muscle movement, demanding that the compositing team worked precisely with each individual body part so that every movement felt believable.
“It was a shot by shot challenge,” Mitchell said. “This is where the art comes into play. The plates gave us the base lighting, however, we needed to create bounce lighting to help sculpt the character into the scenes, without bringing attention to the lighting changes. A fair amount of time was spent building gobos to break up the light on the character and subtle movements in shadows.
Skin is quite temperamental where lighting is concerned. It was important to not rely too much on sub-surface scattering, which can lend a waxy look if not used judiciously. The character had micro-hairs as part of the overall groom, which helped to break up the direct light to avoid the plastic look. Those techniques, along with selective matting and use of multiple lighting passes in comp, gave us a lot of control. digitaldomain.com
Words: Adriene Hurst, Editor


